First Published 18th Feb 2016
The example code creates lossless BMP files which I have converted to lossy JPEG files for the sake of displaying them on the internet. If you want to see the source files, the best thing for you to do to download the code and try it yourself. It is quite a bit of fun running it against different images and I had quite a bit of fun writing the code.
Link: GitHub Repository
If you would like to see a C++ port of this algorithm, please see C++ Port >
In total the Python code accessible through the Github Link above took me about 90 minutes to write. Just shows how easy to use Python is.
Source Image – Google Images (Sydney Harbour Bridge)
Step 1. Apply a Gaussian Blur. This is done to reduce the noise in the image. The downside is it also blurs the edges. I personally would rather use camera pixel binning to reduce noise than apply a blur filter to the image, it is however quite effective as you can see.
Step 2. Gradient Intensity and Direction. What this actually means is we take any given pixel, the pixel above and the pixel to the left. We calculate the intensity gradient on the X axis and the intensity gradient on the Y Axis.
Note: The original image was a full colour RGB image, for the sake of simplicity I first reduced this to a grey scale image. Ideally you would run the entire process on each of the red, green and blue components but for now, we are using a grey scale reduction to the original.
Anyway, back to the two intensity gradient values, they gives us two vectors of a right angled triangle.
We want the gradient intensity so we take the hypotenuse
gradient intensity=SQRT(X^2 + Y^2)
of these two vectors and store that value as the gradient.
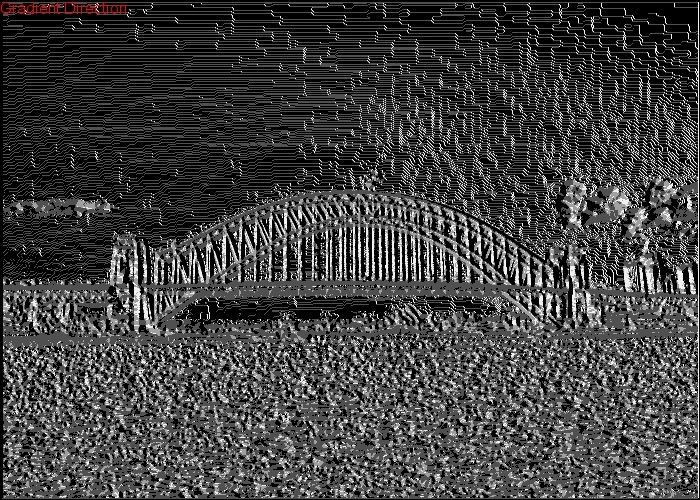
Step 2.1. Gradient Direction. As mentioned above, during the same pass that determines gradient intensity, we also calculate the direction of the gradient. This helps later when we want to refine the edges.
We want to know 0, 45, 90 or 135 degree direction for the gradient. We take the absolute values for the known X and Y gradients from above and using arc tan we can calculate the angle.
Just for clarity sake. arctan2 is a mathematics function that exists in most computer programming languages that you provide two values too and it returns the signed angled in radians.
Note: We are not interested in the sign of the direction only the absolute value and we need the angle rounded to 0, 45, 90 or 135 degrees.
angle=arctan2(x,y)
All very straight forward.
Personally I think the gradient direction when represented like the image below is fascinating. It shows the direction of gradient for the entire image. You can see things in that image you can not see in the original. Anyway, enough of my fascination.
Step 3. Non-maximal suppression. With the edge detection process we ideally want single pixel width edges. So this pass suppresses pixels that are not the highest gradient intensity pixel amongst their surrounding pixels based on direction.
Let me explain. Lets say the gradient direction was 135 degrees. This is like a compass needle facing North West or South East (remember that sign is not important) so we compare this pixel to the pixel above and to the left and with the pixel below and to the right. Hence following the direction of the gradient. If our given pixel is more intense that both of those then we mark it as a binary 1 and the other two as binary 0.
The result is we have found the most intense pixel (strongest edge) along this vector and hence we have highlighted one part of an edge in the image. See below for how this looks.
The JPEG lossy compression has resulted in some of the edges getting fuzzy. So download the code and run it yourself. I tested it on Python 2.7 from a Windows interface with only Pillow installed.
Anyway, enough of that. I also ported this implementation to C++. If you would like to see the C++ specifics, check out the Link: GitHub Repository or if you would like to see just how much faster the C++ version executes, check out C++ Port >